How to Take a Screenshot on a Mac: Every Shortcut
Updated on November 17, 2026 · 5 min read
The short answer
Press Cmd + Shift + 4, then drag to select an area: the image is saved to your Desktop. Cmd + Shift + 3 captures the whole screen, and Cmd + Shift + 5 opens the toolbar for options, the timer and screen recording.
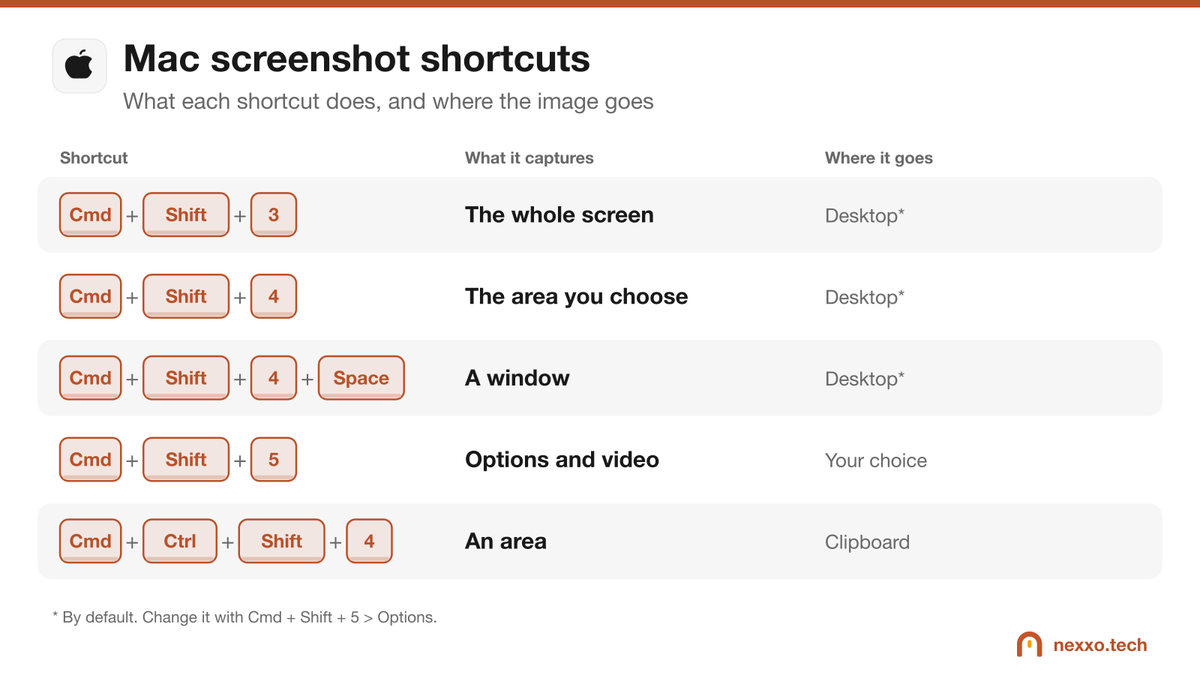
On a Mac, everything goes through three shortcuts that all start with Cmd + Shift. Once you know them, a screenshot takes two seconds. Here is each one, the useful options, and where to find your images.
Cmd + Shift + 3: the whole screen
Press Cmd + Shift + 3. A thumbnail appears in the bottom-right corner, and an image of the whole screen is saved to the Desktop. With several displays, you get one image per display.
Cmd + Shift + 4: the area you choose
- Press Cmd + Shift + 4. The pointer turns into a crosshair.
- Drag to select the area to capture.
- Release: the image is saved. Press Esc to cancel.
While selecting, hold Shift to move only one edge, Option to resize from the centre, or the Space bar to move the whole selection.
Cmd + Shift + 4, then Space: a window
After Cmd + Shift + 4, press the Space bar: the pointer turns into a camera. Click the window you want. It is captured on its own, with a soft shadow; hold Option while clicking to remove it.
Cmd + Shift + 5: the toolbar (options and video)
Cmd + Shift + 5 opens a toolbar at the bottom of the screen. It captures the screen, a window or an area, and can also record a video of the whole screen or part of it. The Options menu lets you:
- choose where screenshots are saved (Desktop, Documents, Clipboard, Preview…);
- add a 5 or 10-second timer, handy to capture an open menu;
- show or hide the thumbnail and the mouse pointer.
Copy without creating a file
Add Ctrl to any shortcut: Cmd + Ctrl + Shift + 4 copies the area to the clipboard instead of creating a file. Then paste it straight into an email, Teams or a document with Cmd + V.
Mark up before sending
Click the thumbnail that appears in the bottom-right corner after a capture: you can crop, highlight, write or draw an arrow, then share the image directly. If you do nothing, the thumbnail disappears and the file is saved.
Where are your screenshots?
By default, on the Desktop, named "Screenshot" followed by the date and time. If your Desktop is overflowing, choose a dedicated folder in Cmd + Shift + 5 > Options. Videos follow the same setting.
What about Windows?
On a PC, the equivalent shortcut is Windows + Shift + S. Every method is in our tip on how to take a screenshot on Windows.
Frequently asked questions
Where are screenshots saved on a Mac?
On the Desktop by default, named "Screenshot" followed by the date and time. You can pick another folder with Cmd + Shift + 5, then Options.
How do I copy a screenshot without creating a file?
Add the Ctrl key: Cmd + Ctrl + Shift + 4 copies the selected area to the clipboard. Then paste it with Cmd + V.
How do I screenshot a single window?
Press Cmd + Shift + 4, then the Space bar: the pointer turns into a camera. Click the window you want.
How do I cancel a screenshot in progress?
Press Esc before you click or release the mouse.